Pages

Friday, November 26, 2010

Sometimes you just need a cookie...

We had a busy day today! After getting the kids pictures taken at Picture People with my Aunt Debbie, cousin Barb, and her son Ben, we had to hit the jungle gym to blow off some steam :)
Ben on the slide

Emma and Aiden
Of course, we had to see Santa too :)

Picture compliments of Aiden (I didn't even know he took it until I downloaded tonight)
And hit the fountain to throw in some pennies...


Next we hit Red Robin where my parents met us for lunch.  We had a blast and I wouldn't change a thing...except for the fact that I ate too much! At least I got a veggie burger so I don't feel AS bad when I ate all my fries :) 

We just got home a little bit ago and I have no idea what I am going to make for dinner.  Emma said she wanted cookies for a snack and I didn't argue.  I made them healthier by making them vegan and by using spelt flour instead of white.  I adapted an Oatmeal Raisin Cookie recipe from the cookbook "Eat, Drink, and Be Vegan" by Dreena Burton.  They were by far the best Vegan Oatmeal Chocolate Chip cookies I ever made.

Vegan Oatmeal Chocolate Chip Cookies
adapted from Eat, Drink and Be Vegan

Ingredients:
1 cup spelt flour
1 tsp baking powder
1/2 tsp baking soda
1/2 cup oats (or 1/4 cup oats and 1/4 cup barley flakes)
1/4 cup organic unbleached sugar
1/4 tsp sea salt
1/4 cup pure maple syrup (I use grade B)
1/2 tsp blackstrap molasses
1 1/2 tsp vanilla paste
1/4 cup canola oil
1/4 cup chocolate chips (use vegan choc chips for a true vegan cookie)

Put all of the ingredients in a medium mixing bowl and stir until incorporated.  The batter will be thick.


Place mounds of dough on a cookie sheet.  I used the pampered chef medium scoop and got 10 cookies out of this batter.
Bake at 350 for 11 minutes.  Allow to cool on the baking sheet for 1 minute then transfer to a wire rack to cool completely (or eat while still warm like we did!).  They will still be soft in the middle when you transfer them so be careful.  They firm up as they cool. 

Enjoy with a big glass of milk soy milk!

Monday, November 22, 2010

A Manic Monday

I woke up this morning feeling a little blue.  I recently cut caffeine out of my daily routine so I needed something else to wake me up and put me in a good mood.  Running crossed my mind first but I am not into running in the cold, and I don't last too long on the treadmill.  I never thought I would say Jillian Michaels 30-Day Shred and good mood together, but that is exactly what I did this morning to start my day off right.  It was the most grueling 20 minutes of my life, and my arms hurt as we speak, but it was a fun and quick way to get in a work out. 

After that, things shaped up a bit.  Kids got in the bath, I got some laundry done, and Aiden was shipped off to kindergarten.  Emma was my big helper today and we went grocery shopping and did some cleaning when we got back. 

All day I wanted to order a pizza for dinner, but after hitting the grocery store I knew it made no sense when the house was full of food.  That doesn't mean dinner can't be easy however, so I made up a Chicken Divan dish in no time at all.  (I do realize it is only 5:00pm and I am already posting about dinner, but I got it done early so I didn't have to do all the dishes at 8:00 at night!)


Chicken Divan

Ingredients:
3-4 cups of chopped fresh broccoli
1.5 lbs boneless skinless chicken breast
1 can chicken broth
1 cup milk
3 tbsp butter
3 tbsp flour
pinch nutmeg
1/4 tsp black pepper
1/4 cup white wine
1 cup motz/parm blend (I got Kraft shredded Italian blend)
3 tbsp shredded parmesan cheese

 On the stove, place your chicken breasts in a pan and pour the can of chicken broth over them.  With a lid, simmer for about 20 minutes until the chicken is cooked through.  Remove the chicken from the pan but reserve the broth from the pan.  While the chicken is cooling, start the cream sauce.

Melt the butter completely in a medium sized saute pan.  Add the flour and whisk until combined.  Add the milk and 3/4 cup of the reserved chicken broth.  Keep whisking until the clumps dissolve and the mixture begins to thicken.  Add the nutmeg, black pepper, and 1 cup of cheese.  Whisk until the cheese is completely melted.  Add the white wine, stir to combine, and remove from heat. 

Meanwhile, in a casserole dish, place your broccoli and 1/4 cup water and microwave until tender, about 4 minutes.  Drain the water and keep the broccoli in the bottom of the casserole dish. Top the broccoli with 1/2 of the cheese sauce mixture.

Cube the chicken once it is cool enough to handle, and place on top of the sauce layer.  Add the rest of the sauce on top of the chicken and sprinkle the shredded parmesan on the top of that.  Bake for 25-30 minutes at 350 degrees or until the top starts to turn golden brown and the sides are nice and bubbly. 

I served mine with Long Grain and Wild Rice from Uncle Ben's.  Doesn't get much easier than that :)

I missed the contest

I have been eyeing up a contest that started on another blog for 2 weeks.  The rules were to make a recipe that highlights vanilla.  Not too hard right? I didn't think so until I realized I was out of vanilla.  I always have a back up...until I use the back up and forget about it (shame on me). 

I use vanilla paste in my baked goods instead of vanilla extract.  The vanilla paste is more concentrated and even has little specks of vanilla beans in there.  It really makes a huge difference in baked goods (in my opinion) and is easier and cheaper than using straight up vanilla beans.  Anyway, I had no vanilla, and the store where I buy my paste had no vanilla.  Enter Amazon.com where I found the vanilla to the left of the post.  This is a great deal being that it is only $18.94 and you get a pack of 3.  I usually use the nielsen-massey brand, but this one was cheaper so I decided to try it out.  I really liked it (and no...amazon isn't paying me to type this...just wanted to share a tip :)

Needless to say, I missed the contest.  I made my dessert but I was a couple of days late with the entry and didn't think I would be able to get enough votes anyway.  Just because I missed it, doesn't mean you all should suffer right? Enter dessert...

Vanilla Pound Cake with Raspberries and Creme Anglaise


Vanilla Pound Cake
Slightly adapted from King Author Flour (www.kingauthorflour.com)

Ingredients:
1 1/2 sticks butter (I used salted)
3 oz cream cheese, softened
1 1/2 cups white sugar
1 tsp baking powder
2 tsp vanilla paste
1 tsp almond extract
5 large eggs
2 cups unbleached white flour

Preheat the oven to 350.  Grease a loaf pan with butter and set aside. 

Using a standing mixer, or hand-held, mix together the butter and cream cheese until combined on medium speed.  Add the sugar, baking powder, vanilla and almond and beat until well combined scraping the sides as you go.

Now, add the eggs one at a time making sure the one before is incorporated when you add the next.  Turn the mixer up to medium-high and beat for about 3-4 minutes.  You will see the volume increase the longer it beats. 

Turn down the speed to medium-low and add the flour a little at a time.  Don't overbeat this time and turn off the mixer as soon as all of the flour is incorporated. 

The batter will be thick so spoon it into the loaf pan.  Put the cake on a baking sheet in case there is spill over and bake for 60-75 minutes.  Check it with a toothpick after 60.

Allow to cool in the pan about 15-20 minutes and then put on a rack to cool completely.  Top it with the Creme Anglaise sauce below or with ice cream...it was soo good you can even eat it plain :)

Creme Anglaise (basically a vanilla sauce...not thick like pudding, but thicker than cream)

Ingredients:
1 cup light cream
1 cup 1% milk (or two cups of what you have on hand - this is what I had)
2 tsp vanilla paste
1/3 cup sugar
4 egg yolks (from large eggs)

Add milk and cream to a saucepan.  Add the vanilla and cook over medium heat about 6 minutes.  Don't let the milk mixture boil.  Remove the pan from the heat.

While the milk mixture is heating up, combine the egg yolks and sugar in a bowl.  Once the milk is hot, add the milk gradually to the egg mixture a little at a time.  I used a ladle.  Stir constantly with a whisk. 

Thanks to my photographer - Aiden!
Once you get all of the milk mixture into the egg one, put the saucepan back on the stove.  Cook another 5-6 minutes over medium heat or until thickened (it will coat the back of a spoon).  Whisk constantly, and again...no boiling!

Pour into a bowl, cover, and chill. 

Don't turn your back or your cake may get eaten!

Wednesday, November 17, 2010

Beef Stew

It's Wednesday and I have class tonight.  My parents graciously agreed to come over to watch the kids between when I have to leave, and when my husband gets home from work.  I promised them dinner so dinner I shall make. 

I think by now you all know how much I love my crockpot.  It is probably one of my favorite ways to cook meals.  I think my crockpot loves to cook Beef Stew.  It comes out perfectly every time.  I wasn't planning on posting this recipe because it is one of those things where I change it up all the time depending on what I have on hand.  Luckily (or not!) for all of you, my friend P asked me for the recipe, and what better way to get it to her than by sharing it here. 


Beef Stew
inspired by Roni at www.greenlitebites.com

Ingredients:
2 lbs cubed beef (I buy mine already cut)
3 sweet potatoes, peeled and cubed
1 butternut squash, peeled, seeded, and cubed
2 smallish yellow onions, cut into quarters
8 oz mushrooms (if I have them)
2 regular sized cans of beef broth
1 can cream of mushroom soup ( I use 98% fat free)
1 tbsp worchestire sauce
garlic powder
black pepper
dried parsley


Throw the meat and veggies into the crockpot.  In a medium sized bowl, combine the soup with one of the cans of broth.  Mix until combined and dump into the crockpot.  Add the other can of broth.  Add the worchestire sauce and sprinkle the garlic, black pepper, and parsley over the top.  I never measure, just do a couple of shakes.

Put on the lid, and cook on low for 6-8 hours.  If you like your stew a little thicker, add some orzo, bulger or any other grain you like into the crockpot about 30 minutes before you serve.

Dinner's Goin' South!

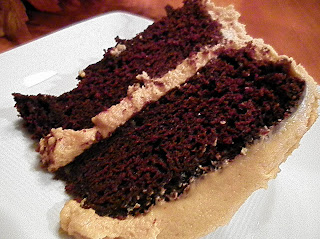
Yesterday was one of those days when I just couldn't get out of my OWN way.  I even posted on facebook about a dilema - chocolate cake with peanut butter icing and watching tv or hitting the treadmill.  Ultimately, the cake won - duh! How could you resist this anyway...

I used Hershey's Perfectly Chocolate Cake recipe and my secret PB Frosting.  If your nice, I might share it with you one day ;)  The only thing I change in the cake recipe is I add instant coffee granules, about 1 tsp to the boiling water.  I grew up with my mom and grandmother putting coffee in chocolate cake and so I always do it to mine too.

Considering the type of day I was having, I needed something quick, easy, and something everyone would eat without giving me a hard time.  Enter Jenna's Barbeque Pulled Chicken recipe from the blog "Eat Live Run".  I have made this multiple times, and it is always a hit.  I served mine with baked beans (Bush's Vegetarian from a can), coleslaw (bought at the local market) and corn muffins (they may or may not have been Jiffy).  I'll tell you what, it doesn't get easier than this and the whole family LOVED it.  


The next time your day is going south, take dinner there too!  You seriously must make this chicken.  It will become a staple in your house too.  I promise.

Tuesday, November 16, 2010

Winter Squash Soup

I talked a little bit before about how my house is being taken over by winter squash and pumpkins.  It doesn't help that I drive past roadside stands in beautiful Lancaster County on a daily basis where long neck pumpkins are as big as medium sized dogs and are for sale for $1.00 (yes...I bought one of those monsters). 

I ended up with a random squash in my CSA that I want to say was a blue hubbard. It wasn't on the pack list so it is really anyone's guess and I could be completely wrong.  Either way, you can turn any winter squash into soup so that is just what I did.  My friend Junes from Painted Parsley made some squash soup recently and some soup also made an appearance on the cover of this month's Vegetarian Times.  Needless to say, that is where I got my inspiration.  Here is my version:


Winter Squash Soup

Ingredients:
1 medium Blue Hubbard Squash (about 3 pounds)
1 small Butternut Squash
2 tart green apples
1 tsp olive oil
1/2 medium white onion, sliced thinly
2 cloves garlic, minced
1/2 cup white wine (I used Pinot Grigio...it's what I had open)
4 cups vegetable stock (I used a box from my pantry)
pinch bay leaves, or one whole one
1/2 tsp salt
1/4 tsp pepper

First, cut your squash in half and take out all of the seeds.  Peel and quarter your apples and arrange everything in a baking dish with one cup of water in the bottom.  Cover the dish and roast at 400 degrees for 40 minutes.

Meanwhile, get the rest of your ingredients together. 


Pictured above I have my pinot, veggie stock, minced garlic, crushed up bay leaves and sliced onion.  Once your all prepped, put one teaspoon of olive oil in a pot and throw in your onion.

Saute the onion until it gets soft, about 3 minutes then put in the garlic, bay leaves and white wine. 


Allow to simmer until most of the wine is gone, and add 2 cups of veggie stock.  Bring back to a simmer.  When your pumpkin is finished roasting, start taking the pulp out with a spoon and put it in the soup pot.  You can also throw in your apples too.  Don't worry if there are still some hard pieces in the squash - you aren't finished with it yet!


It will probably look like bad things happened to the squash.  It's ok.  I had a pretty good mess on my hands too.

Once all of the squash and apples are in the pot, add the other 2 cups of vegetable stock and the salt and pepper.  Stir, and put the lid back on and simmer for about 20 minutes.  If you used a whole bay leaf, remove it now.  If you used pieces like me, just leave them in.  Now use an immersion blender or blend the soup in batches in a standing blender until you get a creamy soup with no squash bits. 


Simmer about 10 more minutes and serve.  I garnished mine with croutons like the ones I made in my Romaine Salad, a little light cream,  and a bit of rosemary.  I also added a tiny bit more salt and black pepper to mine when I ate it.  It is a perfect soup for this chilly fall weather.


NOTE: This is completely vegan if you leave off the cream garnish and use olive oil in your croutons instead of butter.

Enjoy!

Sunday, November 14, 2010

When Life Hands You Pumpkins - Make Pumpkin Pie!

My neighbors and I share a CSA veggie box each week and we have been bombarded with winter squash and pumpkins lately.  We decided to roast our pumpkin together and make a pie since the men in both of our households are huge pumpkin pie fans.  The only thing missing here is a bit of whipped cream ;)

How to Make Pureed Pumpkin
Photographs property of Dain S. ;-)

Cut your pumpkin into large chunks.  We ended up with 4 using this "pie pumpkin".

 Peel out and discard all of the seeds using a spoon.

 Line a baking sheet with foil, and spray with non-stick cooking spray.  Place the pumpkin pieces face down.

Roast for about 2 hours at 375 degrees**.  Check your pumpkin about every 20 minutes after the first hour to make sure you aren't turning it into complete mush.  (**NOTE - cooking times are approximate.  We may or may not have been playing cards while the pumpkin was roasting).

Once your pumpkin is soft take the pulp out and place it into a large bowl until you are ready to make pie!  You can also freeze the pumpkin at this point, or puree it and then freeze it in baggies.


Pumpkin Pie
Recipe from Jillian S.

1 pie crust (We used the one in my Plum Tart)
2 cups pumpkin puree
1 8oz block cream cheese or neufchatel cheese, softened
3/4 cup sugar
1 egg and 2 egg yolks
1 tsp vanilla extract
1/2 stick salted butter, melted
1 tsp cinnamon
1/2 tsp ground ginger
1 cup half and half

Spray a 9 inch pie plate with cooking spray.  Roll out crust and place into pie pan, pinching the edges.  Bake at 350 degrees for 8 minutes. 

While the crust is baking, begin making the filling.  I used a food processor since it was already dirty from pureeing the roasted pumpkin.  Feel free to use a hand mixer, blender, or standing mixer (whatever you have!)  Place the cream cheese in your mixer of choice.  Blend until smooth and creamy.  Add the rest of the ingredients and blend until combined.  Pour into pie pan and bake at 350 degrees for 50 minutes. 

We had extra filling so we made two nice sized "pumpkin custards" in coffee mugs.  They also baked for 50 minutes. 

Allow the pie to cool at room temperature and then refrigerate for 2 hours or until chilled. 

Remember...when life hands you pumpkins...make pie! :)

Romaine Salad with Roasted Garlic Dressing

This is one of my husbands favorite salads.  I wish I could take credit for the dressing recipe, but it was all Emeril.  I found this recipe about 3 years ago and it has been a staple in my house ever since.  If you love garlic, this is for you.  The dressing is creamy, garlicky, a bit tangy...and tastes great on top of crisp romaine and shaved parmigiano-reggiano cheese.  Did I mention the awesome croutons...oh yeah, those help too :)


Roasted Garlic Puree

Ingredients:
4-5 heads of garlic
olive oil
salt
pepper

Preheat your oven to 325.  Cut the tops off of the garlic to expose the top of the cloves.  Drizzle the tops with olive oil, salt, and pepper, and then place them cut side down on a baking sheet.  Roast about 45 minutes or until the cloves are soft and start to ooze out of the shells.  Allow to cool until you can handle them, and then squeeze the pulp into a bowl.  Mash with a fork and set aside until ready to make your dressing.


Roasted Garlic Dressing
Adapted from Emeril

Ingredients:
1/2 cup mayonnaise
Garlic puree from 4-5 heads of garlic (above recipe)
1/4 cup parmigiano-reggiano cheese
1/4 cup buttermilk
Juice from 1/2 large lemon
Salt
Pepper

Throw all of the dressing ingredients into a food processor or blender and mix until all ingredients are combined.  That's it.  Seriously :)


Garlic Croutons

Ingredients:
1/2 loaf of french bread, cubed
1/2 stick butter
1/2 tsp garlic powder
1/4 tsp salt
1/4 tsp pepper

Melt the butter.  Mix garlic, salt, and pepper into melted butter.  Add bread cubes and stir to coat.  Bake at 425 for 15 minutes, stirring once in the middle. 

To assemble the salad, wash and dry 2 heads of romaine lettuce, top with 1/3 cup shaved parmigiano-reggiano and garlic croutons.  You can either mix the dressing in like a Cesar salad, or serve it on the side.  I like to serve mine on the side so that everyone can put on the amount of dressing that they want.  That way you can accommodate those watching their figures :)


Portobello Sliders

We had friends over for dinner last night and I knew I had to make one of my favorite vegetarian meals - Portobello Sliders.  These little burgers are so flavorful, you don't even think about not having meat as a main course. I paired the burgers with sweet potato fries and a romaine salad with homemade roasted garlic dressing.  Don't worry - all the recipes will be coming your way because you will definitely want to make all of it! 

Portobello Sliders

Ingredients:
12 "stuffer sized" portobello mushrooms.  (Weis carries them if you are a PA person)
2 tbsp dry rub (optional - can use a pre-made or make mine**)
6 ounces smoked Gouda cheese, shredded
1 large yellow onion
2 tsp olive oil
12 slider rolls (I used Pepperidge Farm - wheat)
1/2 cup barbeque sauce (There is no other BBQ sauce in my life other than Sweet Baby Rays!!)

** Recipe Below

Start by slicing your yellow onion and sauteing it in a small pan with 2 teaspoons of olive oil over medium-low heat.  You want your onions to be golden brown, soft and caramelized.  This process will take about an hour.  Stir them occasionally so that they do not burn.  When your onions are almost done, start the grill and begin working with your mushrooms.

Wash and de-stem your mushrooms.  Place them hole side down on a dish.  Sprinkle with dry rub and set aside until you are ready to grill. 

Once the grill is hot, brush a little olive oil on the top of the mushroom and place them hole side up on the grill.  Cook over medium-low heat for 5 minutes or until beginning to get soft.  Now, brush a little BBQ sauce in the hole and flip them over.  This will allow the BBQ to caramelize a bit on the mushroom.  Cook about 3 minutes like that.  Brush the top of the mushroom with BBQ sauce and flip again so that the other side will caramelize.  Now that the hole side is up again, reduce the heat to low and stuff some of the shredded Gouda cheese into each of the holes.  Fill with cheese to the top - don't be shy!  Cook only until the cheese is melted, you don't want your mushrooms to get too soft and fall apart. 

Now you have to toast your buns!  When the cheese is melting, open all of your slider buns and place them on the grill with the inside part touching the grill.  They will toast quickly so don't walk away for too long!

Time to assemble these bad boys! Take your bun, and place a mushroom on the bottom part - cheese side up.  Top with caramelized onions and a bit more BBQ sauce on the top.  Close it up and enjoy. 

You are going to LOVE these.  I promise!


Dry Rub (I use it on EVERYTHING!!)

Ingredients
8 tbsp brown sugar
1 tbsp kosher salt
1 tbsp chili powder
1/2 tsp pepper
1/2 tsp cayenne pepper
1/2 tsp old bay
1/2 tsp thyme
1 tsp onion powder
1 tsp garlic powder

Mix it all together and use it on everything! I store mine in an old shaker container and just sprinkle it on meats and veggies before they go on the grill.

Friday, November 12, 2010

Lazy Mom Chicken Corn and Noodle Soup

I have had a craving for Chicken Corn Soup like you wouldn't believe.  I've been trying to ignore it because I really didn't feel like boiling a whole chicken and picking it apart like I normally do.  Enter the lazy mom version! This was so easy and anything I can use my crockpot for makes me happy and makes the house smell warm and cozy all day. 

Lazy Mom Chicken Corn and Noodle Soup

What you'll need:
2 pounds of boneless skinless chicken breasts
8 cups chicken stock (I used two of the quart sized ready made stocks)
1 cup baby carrots
2 stalks celery, cut into sticks
1 medium onion, cut into large chunks
1 tsp dried parsley
Black Pepper
1 16oz bag of frozen sweet corn
4 hard boiled eggs
1 box of pasta shapes of your choice - my kids picked Gemelli today at the store

In a large crockpot place chicken, 1 quart of stock, carrots, celery, onion and dash of pepper. 

Cook on high for 3 hours or until chicken is tender and you can easily pull it apart.

Remove the chicken from the broth and place on a cutting board to cool.  While the chicken is cooling, strain the broth into a large bowl to remove the large chunks of vegetables.  My kids love carrots, so I cut them up and put them back into the soup.  The onions and celery I tossed down the drain.  If your family likes celery in their soup, by all means cut that up as well! :)

Put the strained broth back into the crockpot adding the other quart of stock to the mix.  At this point I added my carrots back in.  Cut or shred your chicken and put it back into the crockpot.  Add your corn, eggs, parsley, and a little more black pepper. Turn the crockpot back on low and let it go until you are ready to serve.

All done minus the noodles
In a seperate pot on the stove, boil water and cook pasta according to package directions.  Once the pasta is cooked you can add it to the soup, or keep it seperate and add it when you are serving.  My husband is working late tonight so I kept the noodles seperate so that they wouldn't get soggy by the time he gets to eat.

I told you it was the lazy version! Sometimes the best meals come from simple recipes :)

Thursday, November 11, 2010

There Once was an Avocado...

...that got turned into a delicious bowl of guacamole.  Guacamole has to be one of my favorite things, and I don't even have a real recipe for it.  I just taste and add as I go, but for the good of the blog, I am going to try my best to measure out the goodness that goes into this wonderful condiment.  So here goes!

Guacamole
3-4 avocados
1/2 cup diced red onion
1-2 cloves garlic minced or 1 tsp garlic powder
1 medium tomato, seeded and diced
1/3 cup fresh cilantro, chopped
Juice of one large lime
1/4-1/2 tsp dried cayenne pepper
Salt and Pepper
1/2 cup black beans (optional)

In a medium bowl, seed and mash the avocados.  Once they are relatively mashed, add the rest of the ingredients and stir to combine. 

Don't judge on looks alone - they can be deceiving!
Watch the amount of salt you add if you are using tortilla chips to dip since they are already pretty salty. I added black beans the last time I made the Guacamole for an extra protein boost.  Use at your own discretion. That's it...super simple, and super delicious!

Chiles Rellenos Casserole

Part of my cooking frenzy earlier this week (maybe last?) included this Chiles Rellenos Casserole.  It may not look like much, but it is packed with flavor.  I personally thought it tasted like an enchilada with green sauce minus the tortilla (see-saving calories already)! I served it with whole grain brown rice that I added corn to before I cooked it and some homemade guacamole .  It was a hit with the whole family.  I didn't want to make it too spicy for the kids so the husband and I added a touch of Tabasco when we were eating it to kick up the spice.  The guacamole helps with that too. 

Chiles Rellenos Casserole
1.25 lbs boneless skinless chicken breast
1 can old el paso green chile enchilada sauce
1 cup diced red onion
1 1/2 tsp cumin
1 tsp dried oregano
1/2 tsp garlic powder
1 can vegetarian refried beans (FYI regular refried beans have LARD)
1 can (4oz) diced green chiles, drained
1 1/2 cups reduced fat Mexican blend shredded cheese
1 cup corn kernels (frozen works great)
1/2-3/4 cup black beans
1/4 cup flour
1/2-3/4 cup milk

Preheat the oven to 350 degrees and spray a casserole dish or 9x13 baking dish with nonstick spray. 

Chop the red onion and put into a saute pan and add the green enchilada sauce and the chicken breasts.

Cover and simmer over medium-low heat until chicken is tender and easily shreds with a fork, about 30 minutes.  Remove the chicken from the sauce and set aside until it is easy to handle.  Don't throw away the sauce - it's good stuff! 

Once you can touch the chicken without burning yourself (I am not patient enough!) shred it and set it aside. 

While your chicken is cooling, take the reserved sauce still in the saute pan and bring back to a simmer.  Stir in the flour to thicken it up.  You are basically making a roux.  Stir constantly so it doesn't burn for 2 minutes. 
Slowly add the milk to make a creamy sauce.  If you need more milk, add a little at a time until you reach a nice pourable yet creamy consistency.  Remove from the heat and set aside. 


In a small bowl combine the corn, black beans, cumin, oregano, and garlic powder.  Set aside. 

Now comes the fun part - layering!  Start with the refried beans.  Make a nice even layer in the bottom.  Next, place the shredded chicken on top and the diced green chilies on top of the chicken.  Put the black bean and corn mixture next and top that with the cheese. 

Watch out for cheese monsters who identify as "helpers"!
Top the whole shebang with the sauce you made on the stove. 

Bake for about one hour or until the sauce is set on the top and the casserole is brown around the edges. 

Voila!